11-15-02

Adding Text to Tubes
by Robyn :o) PSP 7
Adding Text to Tubes

This looks long but it's because I'm going to be explaining some simple tips that I wish I'd known in the beginning, so it's kind of a Lesson/Tutorial Combo  .
.
1. Select the tube you'd like to use. Open it in PSP and you'll probably need to resize it. In the screenshot below you see that I've decided to 'downsize' mine to %70 of the original. Go to 'Image/Resize' and follow what I've done, choosing the size you want.
NOTE:(If the tube you're using is already in your program just use your 'Tube Tool' and decide on what size to make it. Put it in the New Image, go to 'Selections/Select All', then 'Selections/Float' and you'll have your 'marching ants'....start from #5....)
 You may need to experiment until you get the right size, so each time it isn't right go to 'Edit/Undo Resize' and try again .
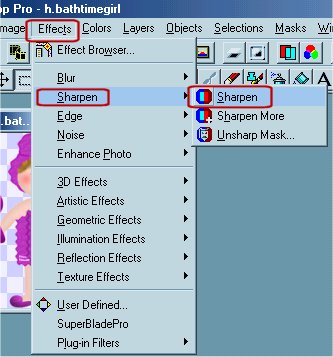
2. After resizing, you usually need to sharpen your tube or image. Go to 'Effects/Sharpen/Sharpen'.
Now your tube is ready!
3. Open a 'New Image' 350x350, transparent background. It's a good size to work with and we'll get rid of the extra space later.

4. Click on the top bar of the box your tube's in to make it the 'active' image, and go to 'Edit/Copy'.
Click on your blank image's upper bar to make IT active and go to 'Edit/Paste as New Selection'.
 You'll see that you can place your tube any where in the blank image. Make sure your tube is where you want it and left click. (If you change your mind and want to move your tube, use the 'Mover Tool'..it's the one that has 4 arrows pointing in each direction.) Your tube now has 'marching ants' around it which means it's "selected" (meaning the part you're working on right now) .

5. You'll want to add a 'Drop Shadow' so your tube doesn't look flat. Go to 'Effects/3D Effects/Drop Shadow.

You'll get this box:
 You can experiment with the settings to see how they work and use my settings... or your
own if you'd like. Click 'Ok'. You can repeat the Drop Shadow and change the Horizontal
and Vertical each to -1, and you'll have a shadow all around your image.
You can experiment with the settings to see how they work and use my settings... or your
own if you'd like. Click 'Ok'. You can repeat the Drop Shadow and change the Horizontal
and Vertical each to -1, and you'll have a shadow all around your image.
TIP: If you put your cursor in either of the windows where your tube is, it'll turn into a small hand. You can left click, hold down, and move your tube around to see different areas...neat huh?
6. Once you've added your drop shadow go to 'Selections/Select None' since we're finished working with the tube.
Now to add the text!
7. You'll probably want your text to match a color in your tube, so we'll use
the 'Dropper' on your toolbar as shown.
 8. On the right side of your screen are boxes that say 'Styles' and 'Textures'. We won't use textures for now so set both boxes under textures to 'Null'.
Click on the little black arrow, then the circle with the line thru it. That means textures are 'turned off' for now.
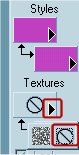 9. Make sure both boxes under 'Styles' are set on the 'Paintbrush'. The paintbrush is for solid colors only. Click on the little black arrow and then on the paintbrush. Do this in both styles boxes. The top box is your foreground color, the
bottom box is your background color.
9. Make sure both boxes under 'Styles' are set on the 'Paintbrush'. The paintbrush is for solid colors only. Click on the little black arrow and then on the paintbrush. Do this in both styles boxes. The top box is your foreground color, the
bottom box is your background color.
 10. Move the Dropper around on your tube and you'll see the colors in your RGB box (not sure what it's called lol) change.
 When you have the color you want to use just left 'and' right click. We're making it simple for now and making your foreground and background colors the same. The left click
sets your foreground color. The right click sets your background color.
When you have the color you want to use just left 'and' right click. We're making it simple for now and making your foreground and background colors the same. The left click
sets your foreground color. The right click sets your background color.
Page 2