8-12-03

**..Adding Text to Animations..**
by Robyn...
with PSP 7
Before..........and..........After


If you're going to be using this animation..and want to learn a few extra things, just rt click on it and 'Save As' in a folder where you can find it!
If you're using a different animation and have room on it for your text, then you can skip to Page 2 and it'll be a very short tutorial!
I'll be writing this as a Beginner tutorial and am adding a lot of screen shots so hopefully, that'll help.
OK! Ready? Set! .. lol....just kidding...here we go...!
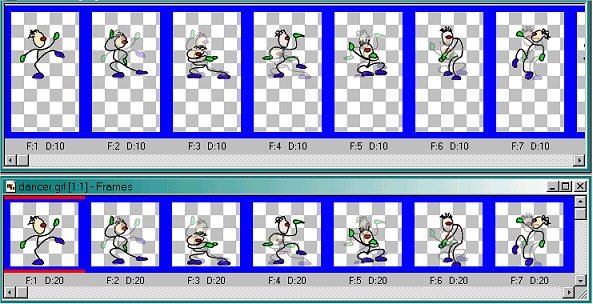
1. Open Animation Shop (AS) and open your animation. Whether it's the Dancer gif or another one, we'll start with adding extra space for our text. The Dancer gif is 85x80 as you can see in the bottom bar, which is called the Status Bar. It also shows you there are 14 frames. If you right click on one of the frames and go to Frame Properties you'll see that the Display Time is 20, that's how fast or slow it moves. We'll need that info when we add new frames. Some animations have different speeds in some frames, but all of ours are 20. We need to make a new set of frames that will have room enough for the dancer and the text. 85x150 is what I used to make room for my name under the dancer. You can decide if you need to make it wider or maybe make your name smaller if you have a longer name.
Ok, click on the New Animation button:  .
.
This box will open:
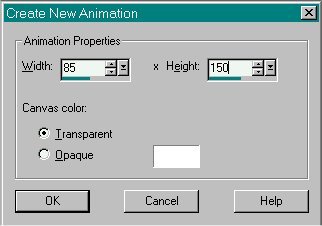
You can see that I put my 85x150 in the width and height boxes, also Transparent for this one. Enter the size you need in the boxes, Transparent, and click Ok. A blank frame will open.
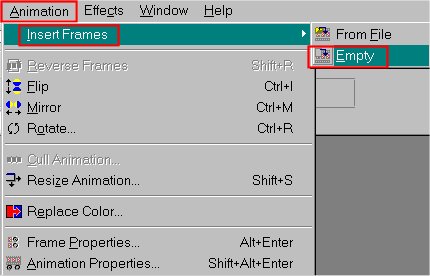
2. Since our animation has 14 frames, we've just opened one and need 13 more. You can either 'Duplicate' until you have a total of 14 frames, or you can do it this way. This might be helpful to know someday :o)
Be sure the new frame is active (blue around the edges). Go to 'Animation/Insert Frames/Empty', as shown:
3. This box will open:
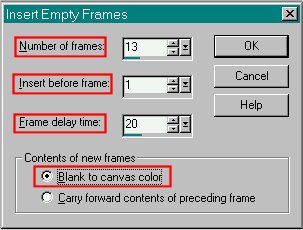
Add the information we need for our new frames, click ok and the 13 new frames will be added to the one, giving us 14.
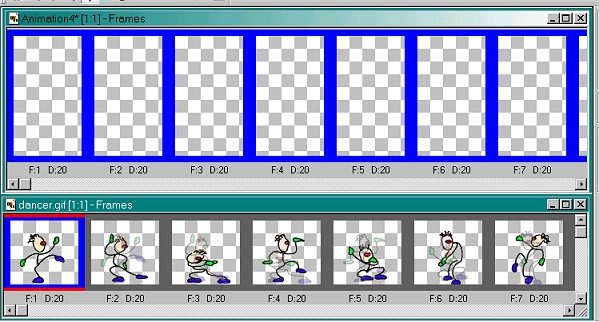
Stretch out both sets of frames, our original dancer and the new frames using the little double arrows that show up when you put your cursor over the edges of the frames. Make sure the 'first frame' shows on both sets and is active (blue around the edges). This is what we have:
4. Now this part sounds a little confusing but take one step at a time and it should make more sense after you've done it a time or two. I don't use keyboard shortcuts so this will all just be written out. We want to move our dancer into the bigger frames so here goes. Click on the top bar of the dancer frames to make it active. Go up to Edit/Select All, we don't want to leave any out! :o)
Then do Edit/Copy. Now click on the blank frames top bar to make it active and go to Edit/Select All, then Edit/Paste into Selected Frame. The dancer will be on the tip of your cursor in the first one or two empty frames. Put it toward the top so there's room at the bottom for your name, but also room at the top so he doesn't bang his head! :o) Click and the dancer will show up in all the frames! Neat huh? If something isn't right just repeat step 4 again. You're just copying the dancer and pasting him into the blanks.
This is what we have!
Ok, now's a good time to empty your Clipboard, so just go to Edit/Empty Clipboard. You want to empty that often.
You can move them out of each others way by clicking on the 'top bar' and moving one up or down. Our new dancer frames are ready, so you can close out the original and we'll go to Page 2 and add our name!
...Page 2...
Robyn's Tut'z
Home