Page 2

**..Adding Text to Animations..**
by Robyn :o)
Adding Our Text...
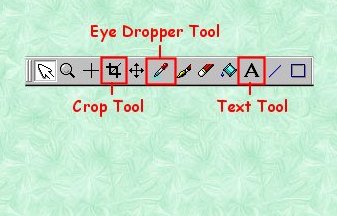
1. Ok, we're all set to add our name. First you need to decide which color you want it to be. You can make your text in PSP so you can use the tools AS doesn't have; like Gradients, Patterns, Super Blade Pro, things like that. This is a simple animation but if you were doing a fancy one you would want fancy text to go with it. I'll cover that later, for now we'll just finish our 'simple' animation. So use the 'Eye Dropper Tool' to pick your color from the 'Color Bar'. Your cursor will automatically turn into the eye dropper when you place it over the color bar anyway but it's nice to know what your tools are. Here's the tools we're using for this part of the tut, and the Color Bar. (woops, I forgot to outline the 'White Arrow Tool'...we're using it too!)
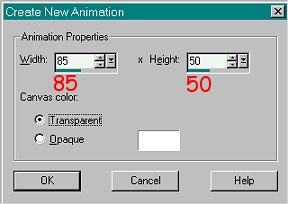
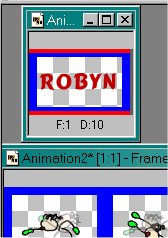
2. The first thing we need to do is make a new animation..just 'one frame' to put our text in. Do the same as we did before when we made the larger frames. Go to 'New Animation' and the 'Create New Animation' box will open. This time we only need to figure out how high we want it to be, since we know it's 85 wide. Our name shouldn't be very tall so I used 50 for my 'height'. We can crop later if you want or need to. Here's how it should look. Put the size in, Transparent, and click Ok.
The small frame for your text will open.
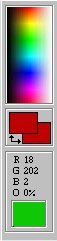
3. To choose a color, just move your cursor over the top part of the 'Color Bar' and in the smaller box at the bottom, it's called the 'Current Color Panel', you'll see the colors change. When you see a color in the smaller box that you want to use just click it for the foreground color, and right click it for the background color. You can also use the 'Eye Dropper Tool' and click on a color from your animation. 
You've chosen your color and are ready to choose which font and size to use.
I used 'Cartoon' at size 16. Your size will depend on which font you use, so just make it so that it fits in the smaller frame. Use your 'Text Tool' to click on your frame and this box will open:
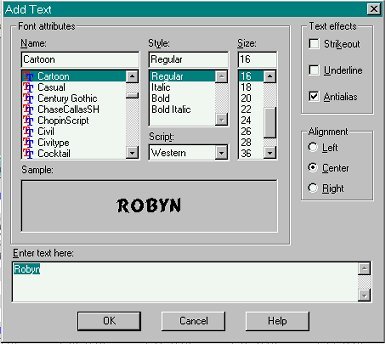
Enter your text and you'll see the 'Sample' in the middle box. Pick the font you like and a size that'll fit in your text frame. If it doesn't fit the first time just start over till you get it right :o)
Here's where we are now!
4. We don't need to make all the frames to copy and paste this time, even though you can do it that way. I just learned something new and we'll use it here. It's called 'Propagate Paste'. Here it is and also the 'View Animation' button:
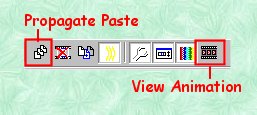 You'll see that the propagate paste button stays recessed while you're using it, and goes back to being flat again when you're finished and click on it.
Ok, click on your 'Propagate Paste' button. Click on your dancers top bar to activate it and go up to 'Edit/Select All'. With the white 'Arrow Tool' click on your text (not the whole frame, just the text) and drag it down to the first frame of the dancer, the text will be on the tip of your cursor. Place it where you want it and click...it'll be in all the dancer frames! Wow! I love that part! lol.
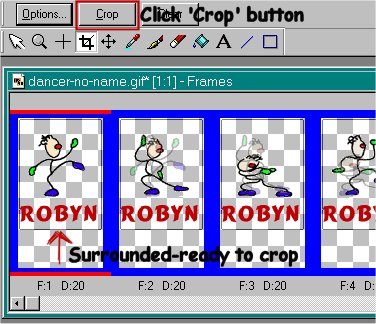
5. Turn off the 'Propagate Paste' button, and close out the small text frame which is now empty. Crop your dancer frames if you need to get rid of any unwanted blank space. The Crop tool is used to surround the area you want to save, which is just the dancer and your name. If it isn't surrounded the way you want it, just right click outside the area and try again, when you have it right just go up and click the 'Crop Button'.
6. Click on the 'View Animation' to see how fast or slow your animation is going. This will probably be too fast as it will go to the default speed of 10 on a new animation. Go to 'Edit/Select All', right click on one of the frames, click on 'Frame Properties' and this box will open:
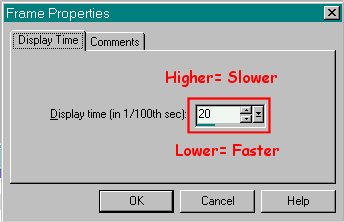
Set your Display Time to 20 since that's what we started with, unless you'd like it to go slower or faster. View your animation and if you're happy with it go to 'File/Save As' and save it to a folder. All Done!!
...Making the Text in PSP...
If you want to make your text using the tools in PSP to make it fancy, use Super Blade Pro, Glitter, etc, just use the size you need for your text in AS. Open a new image with those measurements, make your text the way you want it and save it in a temp file. Be sure to have a transparent background. Open it in AS and follow the instructions from #4.
I know this has been really long but you've learned a whole lot in one little tutorial!! I hope you enjoy learning all the little tips and tricks as much as I do and I hope you're happy with your new animation!!
If you need help, email me using the Email Form on the Home page, I'll do whatever I can to help...I'm still pretty new to all this too!
Hugs!

SHEESH...one more thing! I have no idea where I picked up that animation! If it's yours please write, I'll very gladly give credit where credit's due!!
For my "Official Testers".... It's Party Time!!!


..Page 1..
Robyn's Tut'z
Home