One of the first things I wanted to learn was how to make things 'sparkle'. It's real simple, so here we go...
1. Open a New Image, make it the right size for the tube you want to use, and make it transparent, or add a background if you'd like. Mine is 250x250.
2. Add your tube.
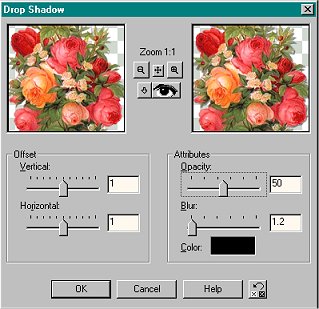
3. Add a Drop Shadow. Vertical and Horizontal at 1, Opacity 40-50, Blur 1.2, Color Black....or whichever looks best with your tube. If you want the shadow all the way around your tube, repeat the Drop Shadow and change the Vertical and Horizontal to -1, I did on mine.
4. Make 3 copies of your Image. Either do Shift/D, or Window/Duplicate, so that you have a total of 4 Images. Minimize all but the first one.
*Minimize=Click on the little minus
- square up in the right hand corner at the top of your image.*....(someone didn't know that once so I thought I'd add it
Picking a sparkle tube will be your choice, since it needs to go with the tube you're using.
I'm using a white sparklie and have made it pretty small.
5. With your first image open, add the sparkle tube 4 or 5 times in various spots on your image. You can add as many as you want and make your sparkle as big as you want! If you're making your Image background transparent don't get too close to the edges with your sparkle! It'll make a weird blob of light sometimes.
6. Open your second image and do the same thing, putting the sparkle in different places than the first.
Do the same with the last 2 images.
7. Merge All on each Image for a solid background, Merge/Visible for a Transparent Background. Save your images, numbered from 1 to 4 in a temporary folder. I named mine psp temp.

Now Open Animation Shop!

(Or...'File/Jasc Software Products/Launch Animation Shop' if the button isn't showing.)
You get to see your pretty in action!
Click on the Animation Wizard.

Or....go to 'File/Animation Wizard' if the button isn't showing.
Click 'Same size as first image',
Next, 'Transparent',
Next, 'Upper Left Corner of the frame', 'With the canvas color',
Next, 'Yes, repeat the animation', 'How Long'--'20',
Next, 'Add Image'
Click 'Add Image' and find your temp folder with your images in it. **Here's a little trick I learned that makes it much easier when you're adding several images...**
Hold down the CTRL key while you click on 4,3,2,1. Then click 'Open', walaa! They open in the right order :o)
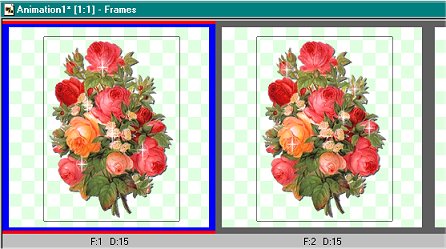
Click 'Next' and 'Finish', all 4 Frames will open. If you need to Crop your image do it now....otherwise just ignore this part
**...How to Crop Your Image...**
Click on your 'Crop Tool'.
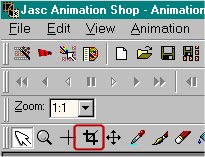
The Crop Tool works almost like the Selections tool, so select the area you want to keep with your crop tool. It'll do all your frames at one time, so you just have to select in the one frame.
If it isn't how you want it just 'right click' and try again. Now just click the 'Crop Button'. It's so easy to do and now you don't have a lot of wasted space around your image
.
Minimize your frames and go up to 'View' and click 'Animation'.
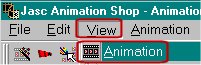
You might have the 'Animation' button on your toolbar, if so just click it.
If you're happy with the way your animation looks go to 'File/Save As', find the folder you want to save it in, give it a name, and click 'Save'.
All Done!
**If you want to change how fast the sparkles are going,**
**here's what you do!**
Close the animation...your frames will still be there!
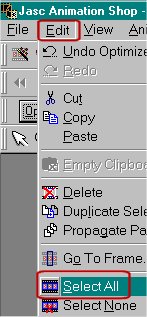
Go up to 'Edit/Select All'...
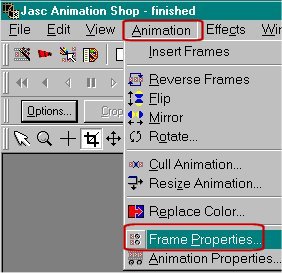
Then--'Animation' and click 'Frame Properties'.
A box will open with the 'Display Time' in it.
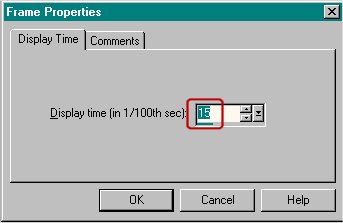
The lower the number, the 'faster' the animation goes. The higher the number, the 'slower' it goes. Play around with different numbers till your animation is how you want it, then 'Save As'.
Each time you want to change it, just close the animation and go to Animation/Frame Properties and try a different number...
ALL DONE!!
**Note**If things just aren't right... or to always be on the safe side 'ALWAYS' check your Optimization Settings in Animation Shop. They have a way of changing on their own....here are the best settings I've found.....PS..you need to have something in there for the Op Wizard to show up on the list. An animation or a tube will do .
Optimization Settings
If you need help please email me, I'm more than happy to help whenever I can! My email addy is on the Home Page.
I hope you had fun and maybe learned a couple of new things in this tut!