10-8-03

 by Robyn :o)
* PSP 7 was used and this should be ok for an advanced Beginner *
I thought this would be a fun project to make. You can send little mini-albums to friends and family right in your email, save them on your website, or share with your friends in your groups. It's great for those occassions when you want to send 'a few' pictures...this just makes it kind of fun...You can even make a full-sized album! 
Some Examples:


 Here's mine...not exactly 'new arrival' pics! Oh well...they're cute!

There's a couple of things you need to check before you start. One is the 'layer settings' in Animation Shop. Open AniShop and go to 'File/Preferences/General Program Preferences, click on that and this box will open:
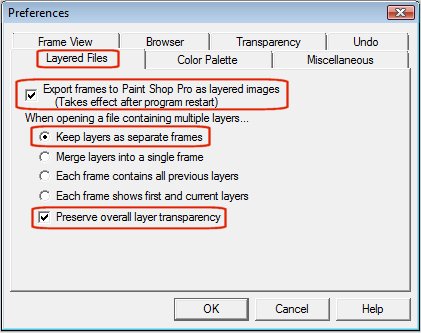
Click on the Layered Files tab and make sure your settings are the same and we're all set!
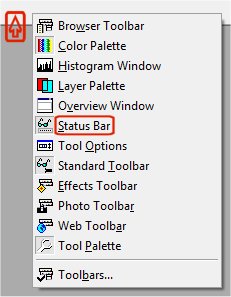
Now that that's ready we need to make sure the Status Bar in your PSP is showing. It displays information about your image, such as size, which we'll need to see.
If you don't see the numbers at the bottom of your screen, right click on any toolbar and make sure the 'Status Bar' is indented, like this:
Ok, we should be all set!
** Be sure to 'Save' often! **
1. First, decide what size you'd like your album to be and how you're going to decorate the cover, that'll depend on what pictures you've chosen. You can make it the full size of your pictures, or a mini-album like I've done. If you're making yours a different size just be sure to stay with the same size for your covers and your pictures. The tutorial will work for any size, just keep in mind..you don't want to try sending an album the size of a Sears Catalog thru the mail, lol.
Here we go with the mini-album...
1. Open a new image size 200x200, transparent.
2. Floodfill with the background color or pattern you've chosen.
3. Select All/Selections Modify. Contract by 10. Selections/Invert.
4. Effects/3D Effects/Inner Bevel. You can use the bevel I have, or play with the settings or Presets until you find one you like best. Here's what I used:
 5. Invert once more, Selections/Float and go to Effects/3D Effects/Cutout. Use the
following settings:

Repeat the Cutout using -2 on the Vertical and Horizontal. Deselect.
For the back cover just go to Windows/Duplicate. Decorate it any way you'd like. Save them as front and back.
6. I'm using pictures of my grandson Evan as my 'model' :o)
Open the pictures you're going to use, how many is up to you. Be sure to duplicate the picture and close out the original. Minimize them so they'll be ready to use but out of the way.
7. With the Selection Tool set at Rectangle, Antialias 'checked', and Feather 'zero', open your first picture. Surround the area in your picture that you want to use. You'll need it to be the same size as your cover so watch the numbers in your Status Bar. When they get to the exact size, let up on your mouse. If you don't get it the way you want it, just right click and try again.
My measurements are 200x200 so here's how it needs to look in the Status Bar:
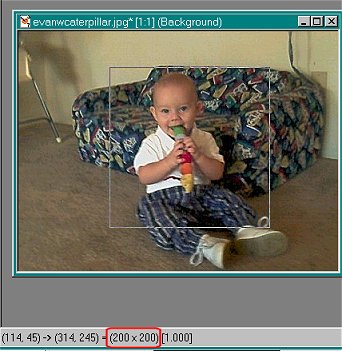
These numbers show the length and width of your selection.
8. Edit/Copy, Edit/Paste As New Image.
9. On the new image Select All, Selections Modify/Contract by '5'. Selections/Invert, then Floodfill with whatever you're using for your cover fill. Add the Inner Bevel. Then Edit/Copy, click on your album to make it 'active' and Edit/Paste As New Layer. Your album now has 2 layers.
10. Repeat numbers 7-9 until you have as many pictures as you want in your album.
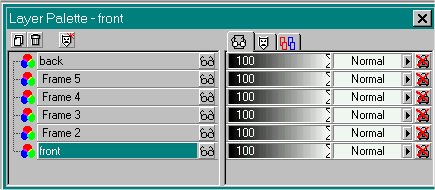
11. When you have all your pictures in, you can copy and paste your back cover as a new layer too and you're all finished with this part! Save your album in a temporary folder so you'll know where it is, and save it as a psp file.
If you need to, you can move your picture layers around so they're in the order you want them to be in. Just drag n drop a layer above or below another. Make the layers so the front and back are in this order tho:
Now for Animation Shop!
12. Open Animation Shop. Find the folder with your album in it and open your album. Spread your frames open from side to side across the work area.
13. You need to set the speed so that each picture will have some 'viewing time' and not just flash by :o)
To do that go up to Edit/Select All, then Animation/Frame Properties.
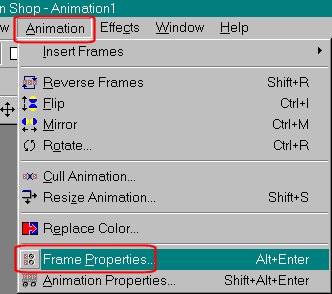
A box will open showing the 'Display Time'. The smaller the number the faster the animation goes, so we want to put a bigger number in there. I set mine at 200 but if you want to have more viewing time you can put 250 or even more, it's up to you...
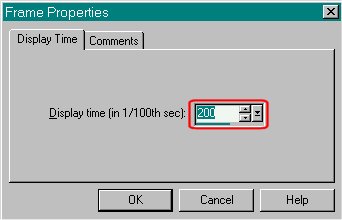
**NOTE** If you want any individual frame to go faster or slower, 'right click' on that single frame, click 'Frame Properties' and the box with the 'Display Time' will open. You can adjust the speed for just that frame.
14. Ok, we have everything all set, it's time to test our album!
Minimize your frames and click on View/Animation, your album will show up and you should be seeing the pages one by one like this:
15. While your album is open and animated go up to File/Save As, give it a name and save it as a .gif. If your frames ended up going backwards, close the animation, File/Select All and go to Animation/Reverse Frames.
All Finished!
I really enjoyed this one....I hope you did too!

As always, if you need any help, my email addy is on the home page...
Hugs,
Robyn :o)
Robyn's Tut'z
Home